|
||

|
|
||||||||||||||||||
|
#2
 01-10-2011
|
|||
|
|||
 Looks Fantastic that mate! 
|
|
#4
01-10-2011
|
||||
|
||||
|
Excluding manufacturers etc etc - that has to be one of the nicest pics I've seen

__________________
|
|
#5
01-10-2011
|
||||
|
||||
|
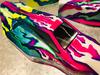
Quite impressed with the shell design, more impressed with the picture ! Well lit, all detail there, pin sharp, fantastic !
|
|
#6
01-10-2011
|
|||
|
|||
|
Quote:

|
|
#7
01-10-2011
|
||||
|
||||
|
I don't suppose 'Ry at your work' would mind giving the rest of us mear mortals some advice. It would be nice to have a photo of his gear when he's taking shots of the car so we can see how the lights and everything is set up. I've got pro gear at work but not a lot of idea how to use it, the shell I did recently was just full of reflection
 I'm sure everyone in this section would be grateful to know how to take better pictures. Cheers
|
|
#8
01-10-2011
|
||||
|
||||
|
I'll do you a guide soon
It ain't easy though and it's a lot of messing about!
__________________

|
|
#9
01-10-2011
|
||||
|
||||
|
Very nice. Reminds me I need to get some shells off to Jon.
|
|
#10
01-10-2011
|
||||
|
||||
|
Quote:
|
|
#12
01-10-2011
|
||||
|
||||
|
Quote:
 haha
|
|
#14
06-10-2011
|
||||
|
||||
|
Looking pimp Nick
|
|
#15
07-10-2011
|
||||
|
||||
|
Come on, stop teasing us, tell us how's done or put a shot up of the set up so we can all try and fudge it

|
|
#16
07-10-2011
|
||||
|
||||
|
Here's the "lightbox". We had a builder in once and asked him if he could knock something up real quick, this is what he made. Honestly I hate it, it casts horrible Orange/Brown light over products and the strip lights just aren't right for this type of photography... Either way I do make it work, but it takes some Photoshopping...
 As you can see, I have a few sheets used as makeshift reflectors, I typically shoot much smaller items and they are perfect for that, not so much on cars. Here's what I do (in the case of the car): • Take photo • Get it into Photoshop • Duplicate the layer • Create a brightly coloured backdrop layer inbetween the two duplicates • Select the top layer and enter quick mask mode, I then paint out the outline of the whole car, just the car (not the shadow). Exit mask mode and delete the selection, this will leave you with the car on a bright background. • Then I change that bright background to White and drag it to the bottom as my background layer. • Then I select the duplicated layer, this will contain the original photo. I desaturate it as this is purely my shadow layer. • I delete any parts of that background layer that I don't need, all the edges and borders and basically leave in the shadowed areas. • Then adjust the levels on the shadow layer, this brightens it up and you'll see it slowly blend into that White background layer as you adjust the levels, once done it'll blend in nicely and you might want to use a soft translucent brush to erase any hard edges of shadow out. • Next it's onto the top main layer, the car itself. • As my lightbox casts a horrible Orangey/Brown light, I need this gone, in quick mask mode I select all parts that contain Red or Yellow in their colour, so even things like hard anodised parts need to be selected, once done exit quick mask and adjust the saturation of the Red and Yellow channels on this area, don't fully desaturate, just enough to remove the strong effect..... • Then I adjust the levels of the whole layer until it blends well with the background and the shadow layer, takes a bit of playing about but you'll get it... The reasons I need to do all that is 1. The horrible light I get casted on items and 2. Parts such as White on a body or a Clear wing will simply dissappear when you adjust the levels of the photo and ruin it all. Edit: See here for the original photo. 
__________________
|
|
#17
07-10-2011
|
||||
|
||||
|
Wow, thanks for the heads up Ryan.
What is at the base of your box that gives the reflection ? It makes it look much classier !
|
|
#18
07-10-2011
|
||||
|
||||
|
It's just White PVC I think! The box is made from wood so he glued a load of that stuff inside...
You only get the reflectiveness when shooting at a small angle, when shooting from above you don't get it. That's one other tip too, get your camera on full zoom and reposition it to fill the frame. Full zoom will reduce and distortion, well with mine it does as it goes all the way down to 15mm.
__________________
|
|
#19
07-10-2011
|
||||
|
||||
|
Ryan's setup is reminiscent of the studio I had in my last job, for eBay items, with the exception I used wireless off-camera flash placed inside the cabinet, and a white sheet, slit down the middle, covering the front to stop light escaping. It was rudimentary in the extreme, but worked quite well.
As for Ryan's issues with light colour, there's a few things that can be done: 1) Set white balance manually, most digital cameras provide this feature - let the bulbs warm up to full luminance, then take a reading off the inside of the lightbox. Your camera will now compensate for the very non-daylight coloured bulbs you're using (around 3000 K rated colour temperature, which explains the orange/brown tones you see). 2) Replace the bulbs with daylight bulbs - these are around 6500 K, a much bluer/cooler colour temperature, and closer to that of the sun. I'd still set on-camera white balance manually, mind. 3) Shoot in RAW and edit the white balance in your RAW processor.
__________________
 Photos: Oople Invernational 2010 - Sodden Sunday Muchmore N. Irish GP 2010 (Touring cars) BADMCC 1/8th Nitro buggies Current cars: X6^2 | JC BJ4WE | TM E4 & E4JS | HPI E-Firestorm | Losi Crawler | + many F1s, super crawlers, scalers, drifters in the works... Last edited by colmo; 07-10-2011 at 02:38 PM. Reason: Added RAW option
|
 |
|
|


 Linear Mode

