Go Back   oOple.com Forums > Car Talk > Team Losi Racing

Reply
 
Thread Tools Display Modes
  #21  
Old 18-03-2011
stegger's Avatar
stegger stegger is offline
*SuPeRsTaR mEmBeR*
 
Join Date: Oct 2006
Location: Liverpool
Posts: 2,714
Default

Quote:
Originally Posted by D20MCK View Post
I finished building mine at about 11:30pm last night

Nice to see a rear mounted gearbox car

Mine didn't arrive wasn't shipped to my LHS won't be here until next tuesday !
Reply With Quote
  #22  
Old 18-03-2011
birdy's Avatar
birdy birdy is offline
Senior Member
 
Join Date: Jan 2008
Location: Tyldesley
Posts: 880
Send a message via MSN to birdy
Default

Quote:
Originally Posted by shark View Post
Nice mate, just one observation, is the battery brace thing in the wrong way round? if you turn it rnd it will hold the lipo in to stop side to side/forward movement.
Hi mate, no the battery brace is the correct way around for Mid motor according to the manual.
__________________
Bury Metro - Club Chairman

www.bmrcc.co.uk
Reply With Quote
  #23  
Old 18-03-2011
Gnarly Old Dog's Avatar
Gnarly Old Dog Gnarly Old Dog is offline
Senior Member
 
Join Date: Jan 2008
Location: A Small Insignificant Blue Green Planet
Posts: 571
Default

Quote:
Originally Posted by birdy View Post
Hi mate, no the battery brace is the correct way around for Mid motor according to the manual.
Yeah I spotted that in the manual. Birdy's right - if you're running saddles in the mid config you need to install the forward battery tray in the orientation as the manual says but...

If you're running the Xcelorin 96mm lipo, you can turn it back round (a la rear config) and it'll hold the front of the battery and stop it from moving from side to side - not that it can move very far - especially with 2 dirty great velcro straps holding the poor little bugger down :-)

Looks like D20MCK's rear config car has the forward tray round the wrong way though?

Looking good though Birdy and D20MCK.
Tidy paint job on CJ's (Delves) shell - no one can wonder there eh

Last edited by Gnarly Old Dog; 18-03-2011 at 09:32 PM. Reason: wrong owner of first car - duh
Reply With Quote
  #24  
Old 18-03-2011
mattb's Avatar
mattb mattb is offline
Mad Member
 
Join Date: Feb 2009
Location: Rochdale
Posts: 1,089
Default

Quote:
Originally Posted by birdy View Post
Here's mine just need to install the speedo and rx tomorrow night, then set up all the geometry.

Nice easy build.

that ally chassis will be bent in two if your esc blows on you again lol
Reply With Quote
  #25  
Old 18-03-2011
shark's Avatar
shark shark is offline
Senior Member
 
Join Date: Oct 2007
Location: Notts
Posts: 632
Default

Quote:
Originally Posted by birdy View Post
Hi mate, no the battery brace is the correct way around for Mid motor according to the manual.
As Gnarley said lol , he beat me to it . All good
__________________
Bmcc .
Reply With Quote
  #26  
Old 18-03-2011
telboy's Avatar
telboy telboy is offline
*SuPeRsTaR mEmBeR*
 
Join Date: Sep 2006
Location: chesterfield - no-mans land!
Posts: 3,175
Send a message via MSN to telboy
Default

Quote:
Originally Posted by Ry @ JE Spares View Post
I'd love to show mine, but you've probably all seen what the box looks like by now

Looking forward to see some electric installs though, Birdy's trying to get a Nosram Pearl into his with the Novak Ballistic motor, looks like it's going to be really tight with the wires!
Not the best pic, but this is how i've loaded mine with a nosram pearl...
You have to remove the battery brace. I tried mounting it on the plate above the motor, but the shell doesn't fit properly.
Attached Images
File Type: jpg IMG00474-20110317-2323.jpg (349.4 KB, 699 views)
Reply With Quote
  #27  
Old 18-03-2011
Kit Jones Kit Jones is offline
Member
 
Join Date: Mar 2007
Posts: 40
Default

Quote:
Originally Posted by telboy View Post
Not the best pic, but this is how i've loaded mine with a nosram pearl...
You have to remove the battery brace. I tried mounting it on the plate above the motor, but the shell doesn't fit properly.
I managed to get mine in with 2 power capacitors and the battery brace still in place. It does need a low profile servo but can be done.
Attached Images
File Type: jpg DSC_0147.jpg (270.4 KB, 823 views)
Reply With Quote
  #28  
Old 19-03-2011
ryanlownie's Avatar
ryanlownie ryanlownie is offline
Senior Member
 
Join Date: Nov 2008
Location: Middleton
Posts: 822
Default

Yeah I think ESC forward is the way. I have the stubby LiPo and will probably get a low profile servo, should be a doddle.
__________________
Reply With Quote
  #29  
Old 19-03-2011
Gnarly Old Dog's Avatar
Gnarly Old Dog Gnarly Old Dog is offline
Senior Member
 
Join Date: Jan 2008
Location: A Small Insignificant Blue Green Planet
Posts: 571
Default

Quote:
Originally Posted by Ry @ JE Spares View Post
Yeah I think ESC forward is the way. I have the stubby LiPo and will probably get a low profile servo, should be a doddle.
Yup - Low profile servo like the Spektrum S6070 really helps in the mid configuration. Still not easy but hey, you don't buy a Ferrari for it's luggage carrying capacity - right?

Seriously, the mid car is tight for install space - but there are options that have already crossed my mind - most of which involve fabricating some form of small shelf to sit either the ESC or most likely the Rx above the battery.

Having said all that, we did manage to fit all the electronics on the chassis plate during testing so it can be done - Kit's install looks pretty good.
Reply With Quote
  #30  
Old 19-03-2011
J.Kirkman's Avatar
J.Kirkman J.Kirkman is offline
Member
 
Join Date: Jun 2010
Location: The posh part of Liverpool! (UK)
Posts: 84
Default

Quick question guys regarding the diff. When looking from the rear of the car what side should the diff adjusting screw be on? I've built it how it says in the manual but this step was a little unclear (drawing). Anyway it works out that my diff screw is on the RHS where as on my X6 which has the same motor/gearbox config the adjustment is made on the LHS. Just want to make sure before I bolt the gearbox in, don't want the diff undoing itself.

Cheers chaps.
Reply With Quote
  #31  
Old 19-03-2011
telboy's Avatar
telboy telboy is offline
*SuPeRsTaR mEmBeR*
 
Join Date: Sep 2006
Location: chesterfield - no-mans land!
Posts: 3,175
Send a message via MSN to telboy
Default

Quote:
Originally Posted by Kit Jones View Post
I managed to get mine in with 2 power capacitors and the battery brace still in place. It does need a low profile servo but can be done.

yep, I'm running a normal servo and it makes everything a bit tight.
Reply With Quote
  #32  
Old 19-03-2011
OneKiwi's Avatar
OneKiwi OneKiwi is offline
*SuPeRsTaR mEmBeR*
 
Join Date: Jun 2010
Location: Sweden but from New Zealand
Posts: 2,033
Default

Theres a lot of talk in this thread and not a lot of pics
Reply With Quote
  #33  
Old 19-03-2011
sparrow.2's Avatar
sparrow.2 sparrow.2 is offline
Mad Member
 
Join Date: Nov 2007
Location: Langenfeld/Germany
Posts: 1,383
Default

Quote:
Originally Posted by J.Kirkman View Post
Quick question guys regarding the diff. When looking from the rear of the car what side should the diff adjusting screw be on? I've built it how it says in the manual but this step was a little unclear (drawing). Anyway it works out that my diff screw is on the RHS where as on my X6 which has the same motor/gearbox config the adjustment is made on the LHS. Just want to make sure before I bolt the gearbox in, don't want the diff undoing itself.

Cheers chaps.
The explanation to that is that you have been running the diff the wrong way round in your X6...
__________________
Reply With Quote
  #34  
Old 19-03-2011
ashleyb4's Avatar
ashleyb4 ashleyb4 is offline
Spends too long on oOple ...
 
Join Date: May 2006
Location: Oswestry
Posts: 6,141
Default

Hi all

All ive done to mine is build it going to take my time getting everything together need new lipo's and tyres and getting shell painted etc. But here it is as a roller..

Only thing i found frustrating about the build was the front hub assembly the screws where tight and the spacers where just annoying! But the shocks! O my god old losi shocks where good but these are in a world of there own! so easy to bleed and build to!! Very impressed with my 22..


22 the losi that was supposidly not coming : ) I stayed faithful!

A
__________________
Ashley Williams

I always thought by 2013 we would have flying cars, but we have got blankets with sleeves!

Reply With Quote
  #35  
Old 19-03-2011
telboy's Avatar
telboy telboy is offline
*SuPeRsTaR mEmBeR*
 
Join Date: Sep 2006
Location: chesterfield - no-mans land!
Posts: 3,175
Send a message via MSN to telboy
Default

Oh, don't cut the motor side of the shell until you fit it, as its not always neccessary to cut it to the lines.
Reply With Quote
  #36  
Old 19-03-2011
shark's Avatar
shark shark is offline
Senior Member
 
Join Date: Oct 2007
Location: Notts
Posts: 632
Default

Quote:
Originally Posted by telboy View Post
Oh, don't cut the motor side of the shell until you fit it, as its not always neccessary to cut it to the lines.
Was thinking the same thing Tel , even on the box it looks like there was no need to cut it back so far, will look even cooler not cut
__________________
Bmcc .
Reply With Quote
  #37  
Old 19-03-2011
Ross's Avatar
Ross Ross is offline
Mad Member
 
Join Date: May 2009
Location: Dunstable
Posts: 1,614
Default

Just a few pic's. need to get the rattle cans out and glue some tyres

There's a Tekin RS in there......honest


__________________
I live with fear everyday....sometimes she lets me race!!!!

Schumacher F1..The original KF.
TLR 5.0 AC .. FORSALE
Reply With Quote
  #38  
Old 19-03-2011
Chris56's Avatar
Chris56 Chris56 is offline
Mad Member
 
Join Date: Jan 2010
Location: Nottingham
Posts: 1,374
Default

Here's my contribution - even with the low profile servo it was a bit too tight to fit my receiver and Speed Passion GT2 esc up front, so I mounted the receiver at the rear.

__________________
www.wbmcc.com
Reply With Quote
  #39  
Old 19-03-2011
ianjoyner ianjoyner is offline
Senior Member
 
Join Date: Jun 2008
Posts: 418
Default

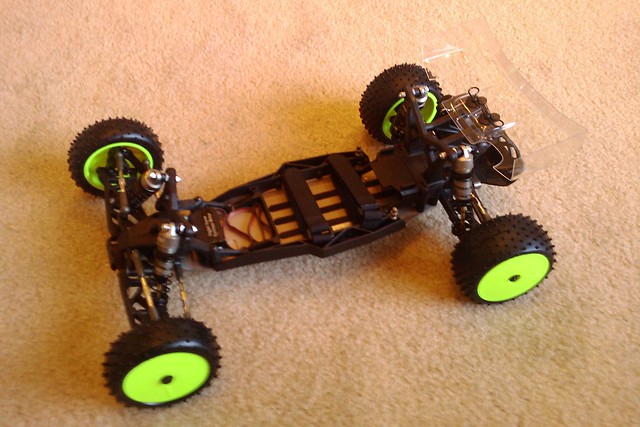
Here's mine, Novak GTB and Futaba R603FS, so not exactly the smallest electronics. I put the GTB up high on the plate at the back, the Futaba receiver just fit between the battery support and the full size servo. Fitting everything to the chassis wasn't too bad, but the body is such a close fit around the back it just touches the ESC heat sink and is hard against the capacitor. There's also very little space for making the connections to the motor, it may have been better if I'd run the wires out the bottom of the speedo.

Reply With Quote
  #40  
Old 19-03-2011
DCM's Avatar
DCM DCM is offline
Spends too long on oOple ...
 
Join Date: Oct 2005
Location: Marvelous South Wales!!
Posts: 8,896
Default

Have you tried it with the shell on to?
__________________
dragon paints : team tekin : fusion hobbies :SCHUMACHER RACING : Nuclear R/C for all my sticky and slippery stuff - if it needs gluing or lubing, Nuclear RC is the man!
Reply With Quote
Reply


Posting Rules
You may not post new threads
You may not post replies
You may not post attachments
You may not edit your posts

BB code is On
Smilies are On
[IMG] code is On
HTML code is Off

Forum Jump


All times are GMT. The time now is 09:02 PM.


Powered by vBulletin® Version 3.8.7
Copyright ©2000 - 2024, vBulletin Solutions, Inc.
oOple.com