Go Back   oOple.com Forums > Car Talk > KYOSHO

Reply
 
Thread Tools Display Modes
  #21  
Old 21-05-2012
mikeyscott's Avatar
mikeyscott mikeyscott is offline
Spends too long on oOple ...
 
Join Date: Mar 2009
Location: Hampshire
Posts: 7,223
Default

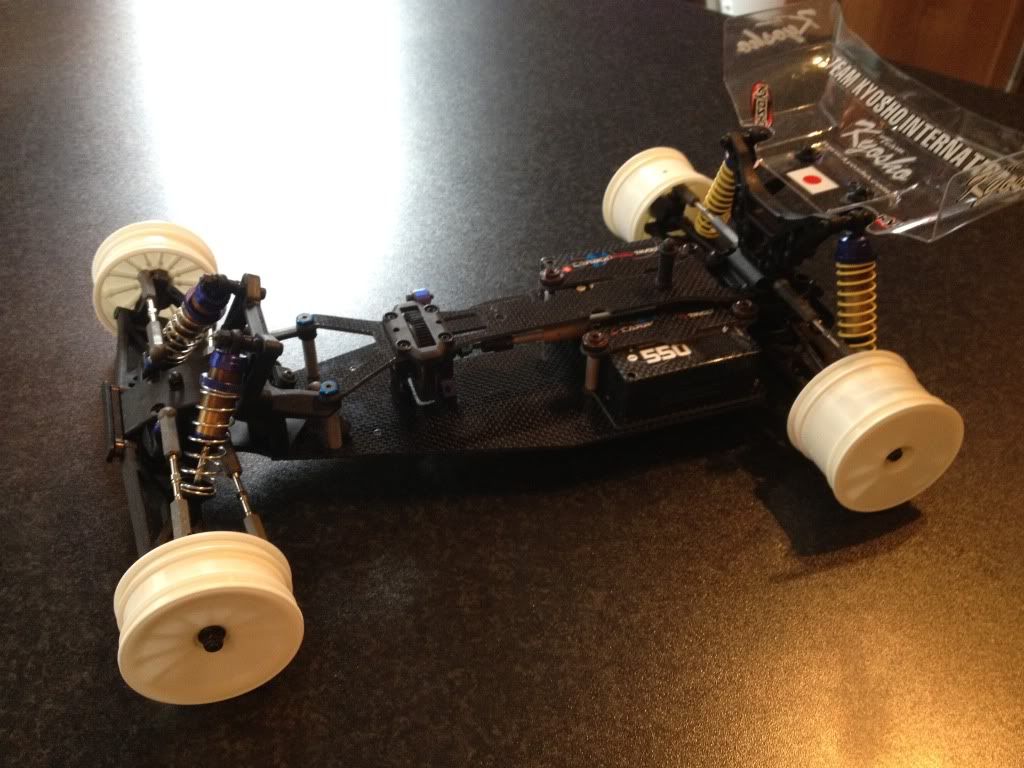
Ran well at the weekend but I didn't lol

LMR to be cut at some point

Proper shell away to be painted and undertray to be mounted soon.

Rebuild of shocks with Core RC oils and rebuild of diff with some RudeBits balls

Now I can rebuild my spare lazer with the parts I have left over
Attached Images
File Type: jpg IMAG0007.jpg (382.7 KB, 296 views)
File Type: jpg IMAG0009.jpg (361.1 KB, 264 views)
Reply With Quote
  #22  
Old 24-05-2012
lcpvcce's Avatar
lcpvcce lcpvcce is offline
Member
 
Join Date: Oct 2009
Location: Hong Kong
Posts: 236
Default

I got it today HAHAHAHA....
many thanks to Tony.................
Attached Images
File Type: jpg DSC01013.JPG (139.6 KB, 176 views)
__________________
atomic carbon & RED
Reply With Quote
  #23  
Old 26-05-2012
Adam F's Avatar
Adam F Adam F is offline
Mad Member
 
Join Date: Sep 2009
Location: Northants
Posts: 1,800
Default

Heres mine.. just need paint now...
Attached Images
File Type: jpg photo-20.JPG (163.0 KB, 242 views)
Reply With Quote
  #24  
Old 26-05-2012
mikeyscott's Avatar
mikeyscott mikeyscott is offline
Spends too long on oOple ...
 
Join Date: Mar 2009
Location: Hampshire
Posts: 7,223
Default

V nice.

Post so off shell pics
Reply With Quote
  #25  
Old 18-06-2012
njc11's Avatar
njc11 njc11 is offline
Mad Member
 
Join Date: Jun 2008
Posts: 1,116
Default Finally finished..

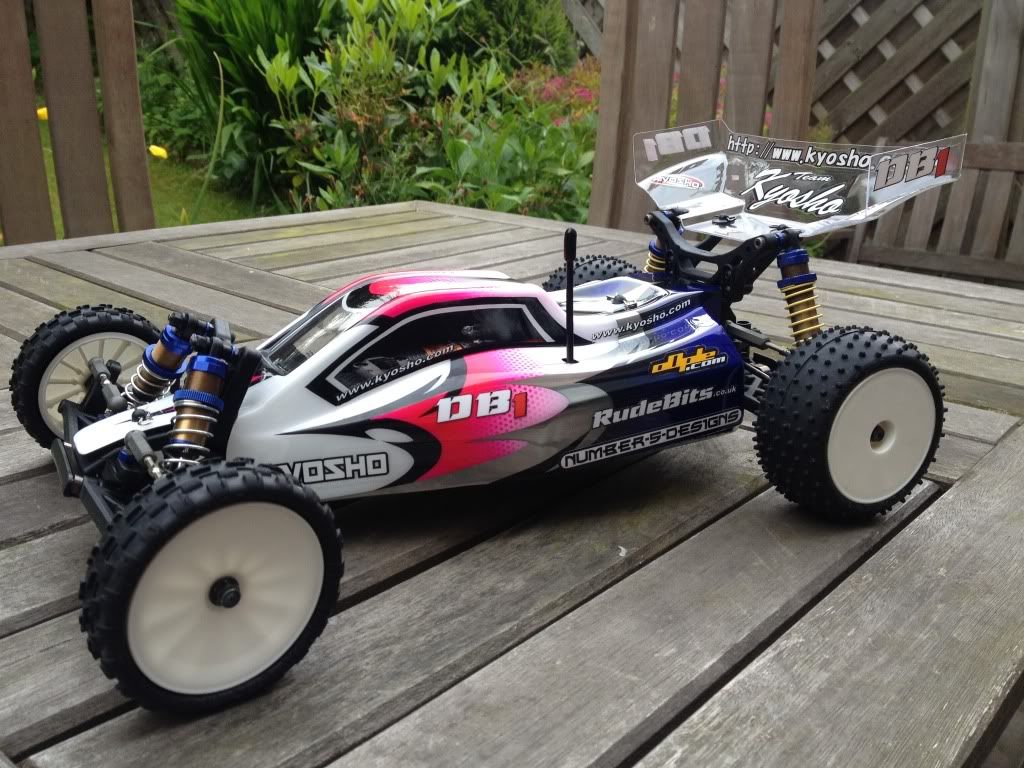
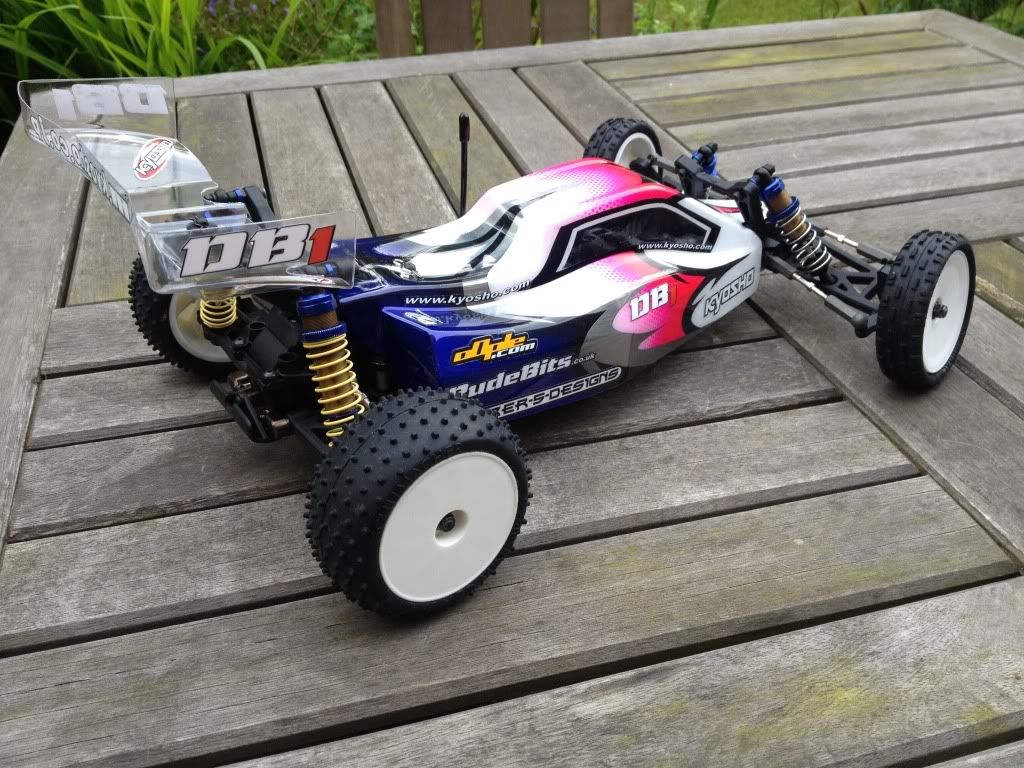
Finally finished building, and installing the electrics.

Have temporary motor in at the moment, just waiting on the VST 7.5 to come back into stock..

Only difference to others ive seen, im running with Big Bores, plus ive flipped the rear tower assembley round... it gives better clearance and shock position in my opinion..
Attached Images
File Type: jpg photo4.JPG (802.8 KB, 204 views)
File Type: jpg photo3.JPG (839.5 KB, 206 views)
Reply With Quote
  #26  
Old 18-06-2012
njc11's Avatar
njc11 njc11 is offline
Mad Member
 
Join Date: Jun 2008
Posts: 1,116
Default

A couple more pics...

Im just waiting on my bodyshell, which should be with me this week

Looking forward to giving it a run... cheers to Tony, Dave and Kev for help, pointers and of course the car!

Attached Images
File Type: jpg photo1.JPG (882.3 KB, 300 views)
File Type: jpg photo2.JPG (816.1 KB, 244 views)
Reply With Quote
  #27  
Old 18-06-2012
Andyp's Avatar
Andyp Andyp is offline
Senior Member
 
Join Date: Nov 2007
Location: north east
Posts: 902
Default

Good idea on the rear shack mount Nic, I only have BB's too and as you say clearance is a little tight, I will be trying that.
Reply With Quote
  #28  
Old 18-06-2012
Adam F's Avatar
Adam F Adam F is offline
Mad Member
 
Join Date: Sep 2009
Location: Northants
Posts: 1,800
Default

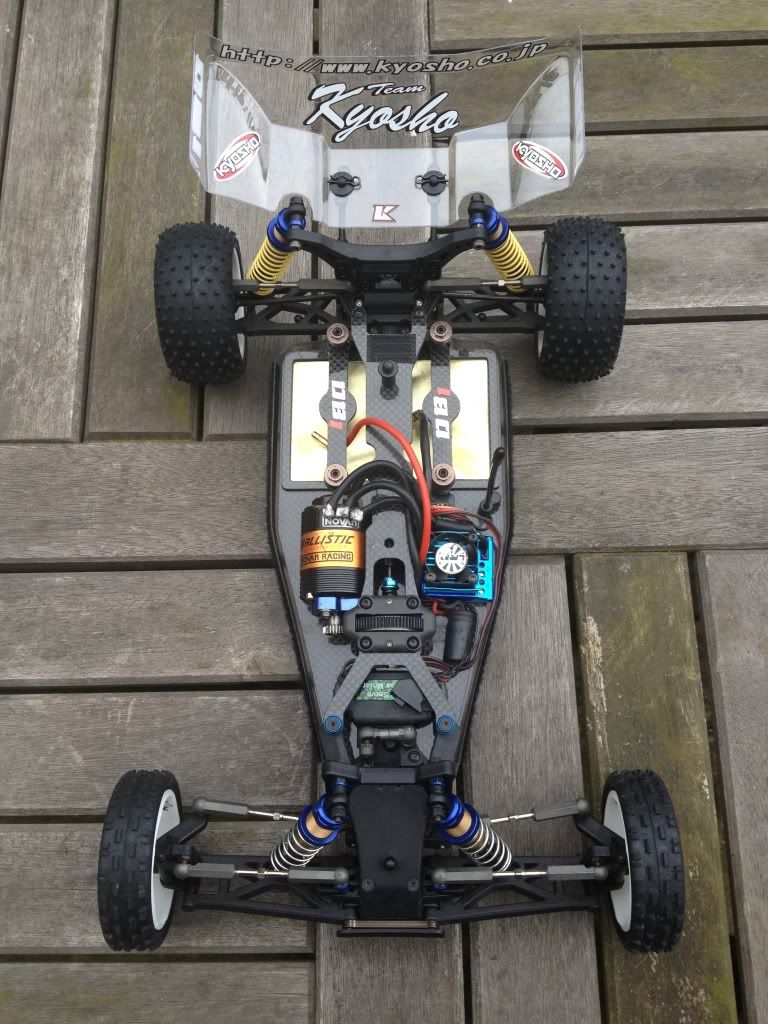
Just a word of warning...I managed to snap the rear tower mount on landing with it mounted backwards.. (Donor had been built incorrectly by previous owner)

Not sure if its directly linked, but there are lots of stress raisers on the front of the mount (rear when reversed), wheras the rear (front when reversed) has a big smooth radius and lots of material to keep it strong..
Reply With Quote
  #29  
Old 18-06-2012
njc11's Avatar
njc11 njc11 is offline
Mad Member
 
Join Date: Jun 2008
Posts: 1,116
Default

Hey, thanks for the pointers..

Ive run the shocks on the rear of my FS to try before and never had any issues with breakages.. fingers crossed it will be just fine
Reply With Quote
  #30  
Old 19-06-2012
RogerM's Avatar
RogerM RogerM is offline
*SuPeRsTaR mEmBeR*
 
Join Date: Oct 2007
Location: The middle of off-road nowhere ----- Cheltenham
Posts: 4,258
Default

Looking good as always Nick.


I must admit that I just threw equipment in to mine as I pulled it out of the FS2 (didn't even desolder the motor wires) so there will be no pictures ... also ran it with the white overspray film as the colouring

Car was great from the word go, once I'd worked out the equivelent oils in the AE range to what Kev runs that is (straight cst number comparison doesn't quite work)!
Reply With Quote
  #31  
Old 19-06-2012
adon30's Avatar
adon30 adon30 is offline
Senior Member
 
Join Date: May 2008
Location: Redditch
Posts: 490
Default

Quote:
Originally Posted by RogerM View Post
Car was great from the word go, once I'd worked out the equivelent oils in the AE range to what Kev runs that is (straight cst number comparison doesn't quite work)!
You should know that Rog. I have the same problem with your AE oil rates.
Reply With Quote
  #32  
Old 19-06-2012
mikeyscott's Avatar
mikeyscott mikeyscott is offline
Spends too long on oOple ...
 
Join Date: Mar 2009
Location: Hampshire
Posts: 7,223
Red face

Quote:
Originally Posted by RogerM View Post
Looking good as always Nick.


I must admit that I just threw equipment in to mine as I pulled it out of the FS2 (didn't even desolder the motor wires) so there will be no pictures ... also ran it with the white overspray film as the colouring

Car was great from the word go, once I'd worked out the equivelent oils in the AE range to what Kev runs that is (straight cst number comparison doesn't quite work)!
Roger, just get some pics up
Reply With Quote
  #33  
Old 19-06-2012
RogerM's Avatar
RogerM RogerM is offline
*SuPeRsTaR mEmBeR*
 
Join Date: Oct 2007
Location: The middle of off-road nowhere ----- Cheltenham
Posts: 4,258
Default

I can't mate ... not a clue how to get them small enough.
Also as a photographer I am about as much use as a chocolate fireguard!

Mine looks like yours, with a white body (inc windows) and wiring that looks like a blind bloke did it!!!
Will tidy it up when I pop the R10pro in before the weekend
Reply With Quote
  #34  
Old 19-06-2012
Rich D's Avatar
Rich D Rich D is offline
*SuPeRsTaR mEmBeR*
 
Join Date: Apr 2008
Location: Lincolnshire
Posts: 2,448
Default

Quote:
Originally Posted by RogerM View Post
I can't mate ... not a clue how to get them small enough.
Also as a photographer I am about as much use as a chocolate fireguard!

Mine looks like yours, with a white body (inc windows) and wiring that looks like a blind bloke did it!!!
Will tidy it up when I pop the R10pro in before the weekend
You post up the info about diff height and driveshaft plunge and i`ll sort posting up your pics Roger
__________________
Richard Drury

See My Feedback

Reply With Quote
  #35  
Old 26-06-2012
Pedros20's Avatar
Pedros20 Pedros20 is offline
Senior Member
 
Join Date: Oct 2007
Posts: 659
Default DB1 pics

Thought it was time to put up some pictures of my DB1 now its finished.
Awesome paint job by Mike at number 5 designs, Thanks again mate.


Body off shot

Reply With Quote
  #36  
Old 26-06-2012
tomtom's Avatar
tomtom tomtom is offline
No trade access
 
Join Date: Jan 2011
Posts: 430
Default

Nice one !

Could you take a picture of the undertray installed and maybe explain how you installed it ?

Got mine but don't know how to secure it properly.

Thanks.
Reply With Quote
  #37  
Old 26-06-2012
mikeyscott's Avatar
mikeyscott mikeyscott is offline
Spends too long on oOple ...
 
Join Date: Mar 2009
Location: Hampshire
Posts: 7,223
Default

V nice
Reply With Quote
  #38  
Old 27-06-2012
Adam F's Avatar
Adam F Adam F is offline
Mad Member
 
Join Date: Sep 2009
Location: Northants
Posts: 1,800
Default

Quote:
Originally Posted by tomtom View Post
Nice one !

Could you take a picture of the undertray installed and maybe explain how you installed it ?

Got mine but don't know how to secure it properly.

Thanks.

Mine is held on by the rearmost front bulkhead screws and the rear gearbox screws the front just tucks under the front bumper..... so dead easy to remove but very secure.
Reply With Quote
  #39  
Old 27-06-2012
Pedros20's Avatar
Pedros20 Pedros20 is offline
Senior Member
 
Join Date: Oct 2007
Posts: 659
Default Undertray

That's exactly how I've fitted mine too.
Fitted it flush with front bumper.
Reply With Quote
  #40  
Old 27-06-2012
Briangb Briangb is offline
Member
 
Join Date: Nov 2009
Location: Hampshire
Posts: 220
Default

Quote:
Originally Posted by Pedros20 View Post
Thought it was time to put up some pictures of my DB1 now its finished.
Awesome paint job by Mike at number 5 designs, Thanks again mate.


Body off shot

Love it, Love it. Have to admit I did get a bit of a preview when Mike sent me a photo of my shells. Yours was in the front of the shot. I also think that the DB1 shell shape is one of the best at the moment. Very very pleased with the work Mike has done for me. Will try and post some piccies of mine when I get the chance.
Reply With Quote
Reply


Posting Rules
You may not post new threads
You may not post replies
You may not post attachments
You may not edit your posts

BB code is On
Smilies are On
[IMG] code is On
HTML code is Off

Forum Jump


All times are GMT. The time now is 07:28 AM.


Powered by vBulletin® Version 3.8.7
Copyright ©2000 - 2024, vBulletin Solutions, Inc.
oOple.com